You are here
How to use Autosum in Excel
This lesson explains how to use Autosum in Microsoft Excel. Autosum is a powerful feature that can save you time if you need to add up cells or columns of data quickly. It is often faster than creating a formula by hand, especially when you have a large amount of data to add up.
With Autosum, Excel will automatically add up a range of cells for you, and place the result in a nearby cell.
Autosum has been around a long time, and will work in all recent versions of Excel, including Excel Online (part ot the Office365 Suite) and versions on the Mac.
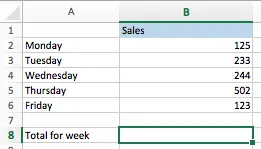
Autosum example one - add up the cells in a column of data
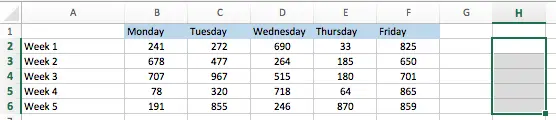
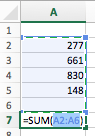
Here is an example of how use Autosum to add up the cells from B2:B6.
-
Click in a cell in the column below the range you want to add up (or to the right of the range if your data is in a row rather than a column).
-
Next, click the Autosum button, which looks like this:

(Tip: You can also press ALT+= (on Windows) or Option+Command+= (on Mac) as an alternative to clicking the Autosum button on the toolbar)
-
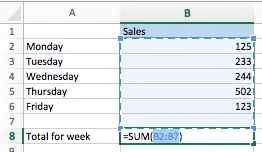
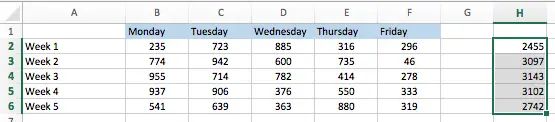
Excel will automatically find the range of data in the column above where you clicked, and will create a SUM formula that will add up those cells. It will then wait for you to press Enter (or Escape if the formula is incorrect):
- If you are happy with the formula Excel has created for you, you can press Enter to complete the process (note that you won't get this option if you used the keyboard shortcut).
At this point it is worth noting that the SUM formula created by Autosum includes the empty cell in B7. This is not a mistake by Excel. The formula includes all of the cells in the column from the first cell that contained a number through the cell immediately above the cell where the formula is being created. This can be useful later if you need to add extra rows of data to your table since it will mean you won't need to change your formula. If you don't want the empty cell, then you can change the range you select before pressing the Autosum button (i.e. select B2:B7 in the example above).
Autosum example two - add up the cells in multiple columns of data at once
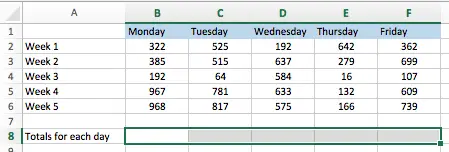
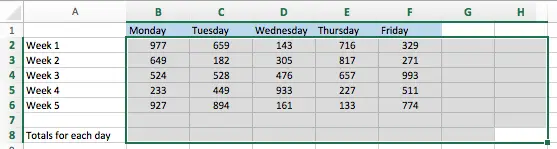
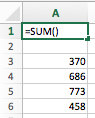
The next Autosum example shows you how to use Autosum to add up multiple columns at once. Here's the data we'll use for this example. I've selected the cells where I want my automatically generated formulas to go:
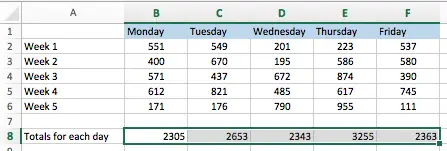
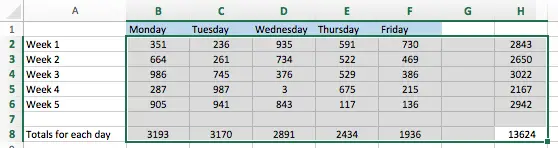
In this case, clicking the Autosum button will automatically generate the formulas for each column (B to F) and enter the results immediately, as shown here:
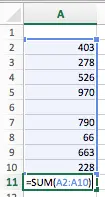
Autosum example three - add up the cells in a row of data
This example is similar to example two, except it adds up data in multiple rows rather than multiple columns. We start by selecting the cells in the rows we want to add up:
After we click the Autosum button, the results look like this:
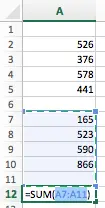
Autosum example four - add up rows and columns of data at the same time
In this Autosum example, let's say you want to add up both the columns and the rows in this data table. You would select the data as shown below, and simply click the Autosum button:
Clicking the Autosum button will put the column totals in the last row of our selection, and the row totals in the last column of our selection, plus a grand total in the bottom-right corner of the selection:
Troubleshooting Autosum
Autosum is clever, but it follows some simple rules for deciding which cells to include in your formula.
The first rule to know is that Autosum can only go up or left, not right or down. Here's an example:
-
Autosum will work here:
but not here:
The second rule to know is that Autosum stops when it hits an empty cell or a cell that doesn't contain a number. Here are two examples demonstrating this:
-
Autosum won't jump from the first range to the second range in this example:
-
However, if you select the cells you want to use Autosum with, the gap will be ignored:
-
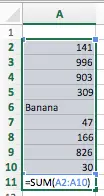
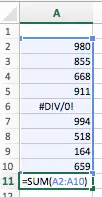
Similarly, if you have a non-numeric value in your range, Autosum will stop when it reaches that value:
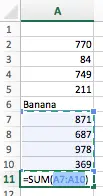
-
However, if you select the range, then the non-numeric value(s) in the range will be ignored:
-
The exception to that last example is if the non-numeric value is an error (strictly speaking, the Autosum formula will work but the error will stop it calculating the result).
Summary
This lesson showed you how to use the Autosum function in Excel. It is a quick way to add up data in your spreadsheet if you don't want to type in formulas. You learnt how it could be used to add up both rows and columns of data automatically at the click of a button. You also learnt about some of the scenarios where Autosum will not work, or will not work as expected.
If you have any questions or comments on this lesson, please leave them below.
Our Comment Policy.
We welcome your comments and questions about this lesson. We don't welcome spam. Our readers get a lot of value out of the comments and answers on our lessons and spam hurts that experience. Our spam filter is pretty good at stopping bots from posting spam, and our admins are quick to delete spam that does get through. We know that bots don't read messages like this, but there are people out there who manually post spam. I repeat - we delete all spam, and if we see repeated posts from a given IP address, we'll block the IP address. So don't waste your time, or ours. One other point to note - if you post a link in your comment, it will automatically be deleted.
Add comment